Most Addictive Hobby. Ever.

March 16, 2010

It may look like a childrens toy, but looks are very deceiving in the RC Heli world.

Before I go into detail let me give you some examples. First the toys. This heli can hover, and do not much else. Its max speed is about 2-3 mph. It is a toy, a 2 year old could fly this thing:

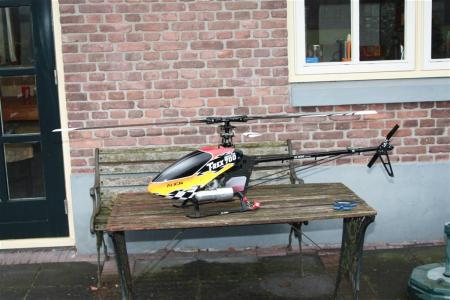
The next heli is a 3500 Watt Collective Pitch Helicopter. The blade tips move in a hover at 330 mph and the heli can fly inverted with a top speed of around 75-80 mph. It weighs 10 pounds, and has a rotor diameter of over 5 feet.  You could call it a toy, but it could also decapitate you if you are not careful.
Here is a video of what they are capable of, no that is not CGI or alien technology. Go to 1:22 and 3:25 in.  Holy shit.

Radio Control Collective Pitch Helicopters have really come down in price and practicality. If you are a beginner on a budget, you can get a T-Rex 450 clone airframe for $38 from xheli.com. The LiPo batteries are only $10 from Hobby King. The expensive part is the radio and gyro, but w/ the new Detrum GY48V HH it is getting cheaper. I bough my radio used on ebay. Total amount spent for DX6 Radio, Gyro, Charger, motor, servos, and 3 batteries not including shipping was less than $350. I have bought enough parts to crash many times. Parts for the T-Rex 450 v2 are super cheap too.

So whats the catch?

  • They are reallly really f*&#ing hard to fly”
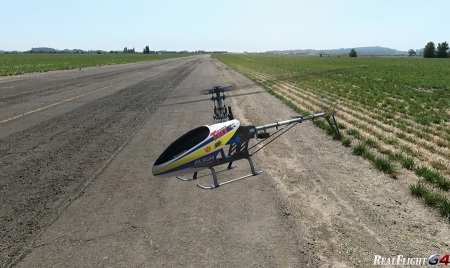
    Are they easy to fly? If you think they look easy I can only describe it as trying to balance standing on a basket ball on top of another basketball while blindfolded and drunk. It took me 6 months and many hours of simulation time. Yes there are simulators for the CP RC heli’s. Here is a screenshot from a simulated T-Rex 450 in the simulator Real Flight G4. Then theres the disorientation which yields immediate panic. Disorientation is when you lose mental sync with what the heli is doing, make a wrong guess, and you may not recover. Yes the sims do come with an RC airplane/heli style remote.
  • A crash can take hours to repair
    Repair is easy, setup and testing takes hours. The mechanics are amazingly complex, but not impossible to understand. There are many videos and tutorials that I found really helpful. There is a source, the best rc heli website of all and the best setup thread ever, it is here:

    http://www.helifreak.com/showthread.php?t=41692

    Thank God for Helifreak and Finless Bob, you will know what I mean if you get into this hobby.

    One thing I discovered. Just when you think you understand the mechanics, you are at your most dangerous. Your lack of awareness of what you don’t know with these things can leave you chasing your tail for hours! Yes that was a bad pun.

    After a minor blade strike, a tail shaft, or main shaft, may be bent a few micrometers. Or your blades may be out of balance by a few tenths of a gram. Your heli will shake so bad it will be all you can do to hold it in a steady hover. If there is any doubt, replace it. Keep many spares.

  • You will always want a bigger heli
    Yup this is true. Bigger heli’s crash harder and cost more than you paid for your first car or a badass motocross bike. Maybe you oughta just get that CRF you always wanted instead.
  • You will never be as good as Alan Zsabo or Jason Krause (sp?)
    This is also true. I will also likely never be able to properly spell their names.
Open High Definition Video Capture Card

February 21, 2010

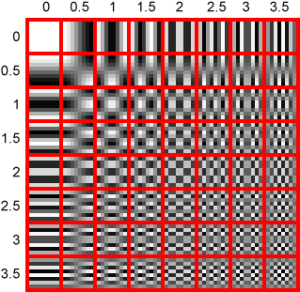
Discrete Cosine Transform coefficients

The page I have created for this project over at OpenCircuits.com is here

Here is an excerpt:

Description
This project will capture High Definition Video 1280×720 at 30fps, and hopefully be capable of 60fps and maybe even 1080p. I intend to use a cheap FPGA, A HiSpeed USB PHY, and an Analog Devices Video A/D chip. I will nail down exact chip numbers later. The target platform driver and example code will be written for linux. This project is more a proof of concept and more for fun and excercise rather than to be practical. But I will take any advice and help that I can get and who knows what we might create here. Entire BOM should be less than $40 but we’ll see.

Yes I know about the Hauppage HD-PVR or whatever its called that Capures Component video at 720p. The problem is that device uses H.264 encoding, which is just way too expensive to decode, it takes a Dual Core 1GHz Machine at 99%. It is also not totally open to hacking.

Current Status

  • 04/06/2010 Adding the FPGA to the board now, external devboard is gone.  It will be a spartan3e 250 vq100 pkg.
  • 04/03/2010 Firewire Chip found that offers a High-speed parallel interface, TI TSB12LV32IPZ: http://focus.ti.com/docs/prod/folders/print/tsb12lv32.html
  • 03/25/2010 Mailing List has been added, here is the mailman link to subscribe: https://lists.sourceforge.net/lists/listinfo/openhdcapture-discussion
  • 03/24/2010 USB Chip is the USB3250. Working on schematic capture and part selection.
  • 03/19/2010 USB Chip will likely be the USB3250, the USB3318 would be slightly more difficult to put into the UTMI core from opencores.
  • 03/12/2010 Chris http://twitter.com/chrisindallas has offered to help with the USB portion of the project
  • 03/11/2010 Project now has git hosting on git://openhdcapture.git.sourceforge.net/gitroot/openhdcapture/openhdcapture
  • 03/11/2010 Added “How To Volunteer” section. Found this core that should work with the USB chip here: http://www.opencores.org/project,usb
  • 03/09/2010 Created the ad9883a part and package in Eagle. I Began researching what it takes to get the USB3318 chip to work. I am also Considering maybe using the TSB41AB1 1394/Firewire chip. USB is a PITA to work with because of the protocol overhead. If we do Firewire, it will be in addition to USB.

I am in the planning/brainstorming stages, although I have been researching this for at least the last 6-8 months.

I have a working Forward/Reverse DCT algorithm in matlab (actually Gnu Octave) that can compress an image 5:1 with little loss in quality. I have also done much research on putting a DCT in hardware. Currently the DCT will be broken down into 2 stages, and all multiplies/adds will likely be done using a very parallel bit-wide pipeline to keep clock speeds high.

Data Bandwidth Issues
YUV422 720p data comes in at roughly 1280*720*30*16 = 443 MegaBits/s. HiSpeed USB is 480Mbits/s which, after taxes, is probably not enough. Note that 720p60 is twice that. Either way using the DCT and some Huffman coding along with other simple compression techniques we can squeeze the data down a little without hurting quality too bad. My goal is to get it down to 150Mbits/s

Embedded x86 Linux Revisited

March 4, 2009

Now that flash is really cheap, why use squashfs?  Save some time and effort and use this in your initrd for a readonly flash file system.

A non-wordpress-butchered version is available here:

http://pastebin.com/f3655ef7f

Here it is, read my notes at the top for howto actually use it:


# Local filesystem mounting -*- shell-script -*-
#
################################################################
# File:
# /scripts/local
#
# Root, or / in these notes is the initrd's (busybox) root,
# not your system's root!
#
# You need the aufs module for this to work. To do this install
# aufs on your base install, add aufs to: /etc/initramfs-tools/modules
# Now using your target kernel run:
# mkinitramfs -o initrd.img
#
# make a directory, copy an initrd to it then cd to it and:
#
# mv initrd.img initrd.img.gz
# gunzip initrd.img.gz
#
# make sure aufs exists somewhere in /lib/modules//
# After modifying local script, etc do the following in the initrd's
# root folder where /bin and /lib etc is to create a new initrd:
#
# find ./ -print | cpio -H newc -o > ../newinitrd.img
#
# Now tell grub to use this initrd for a RO root filesystem
#
# Note fstab gets hosed, if you need an fstab, make sure this
# script reflects that. I use an fstab for the default initrd for RW
# and none for RO, but you can make this script use a different one for
# RO if you want.
################################################################
# Parameter: device node to check
# Echos fstype to stdout
# Return value: indicates if an fs could be recognized
get_fstype ()
{
local FS FSTYPE FSSIZE RET
FS="${1}"

# vol_id has a more complete list of file systems,
# but fstype is more robust
eval $(fstype "${FS}" 2> /dev/null)
if [ "$FSTYPE" = "unknown" ] && [ -x /lib/udev/vol_id ]; then
FSTYPE=$(/lib/udev/vol_id -t "${FS}" 2> /dev/null)
fi
RET=$?

if [ -z "${FSTYPE}" ]; then
FSTYPE="unknown"
fi

echo "${FSTYPE}"
return ${RET}
}

# Parameter: Where to mount the filesystem
mountroot ()
{
[ "$quiet" != "y" ] && log_begin_msg "Running /scripts/local-top"
run_scripts /scripts/local-top
[ "$quiet" != "y" ] && log_end_msg

wait_for_udev 10

# If the root device hasn't shown up yet, give it a little while
# to deal with removable devices
if [ ! -e "${ROOT}" ] || ! $(get_fstype "${ROOT}" >/dev/null); then
log_begin_msg "Waiting for root file system"

# Default delay is 180s
if [ -z "${ROOTDELAY}" ]; then
slumber=180
else
slumber=${ROOTDELAY}
fi
if [ -x /sbin/usplash_write ]; then
/sbin/usplash_write "TIMEOUT ${slumber}" || true
fi

slumber=$(( ${slumber} * 10 ))
while [ ! -e "${ROOT}" ] \
|| ! $(get_fstype "${ROOT}" >/dev/null); do
/bin/sleep 0.1
slumber=$(( ${slumber} - 1 ))
[ ${slumber} -gt 0 ] || break
done

if [ ${slumber} -gt 0 ]; then
log_end_msg 0
else
log_end_msg 1 || true
fi
if [ -x /sbin/usplash_write ]; then
/sbin/usplash_write "TIMEOUT 15" || true
fi
fi

# We've given up, but we'll let the user fix matters if they can
while [ ! -e "${ROOT}" ]; do
# give hint about renamed root
case "${ROOT}" in
/dev/hd*)
suffix="${ROOT#/dev/hd}"
major="${suffix%[[:digit:]]}"
major="${major%[[:digit:]]}"
if [ -d "/sys/block/sd${major}" ]; then
echo "WARNING bootdevice may be renamed. Try root=/dev/sd${suffix}"
fi
;;
/dev/sd*)
suffix="${ROOT#/dev/sd}"
major="${suffix%[[:digit:]]}"
major="${major%[[:digit:]]}"
if [ -d "/sys/block/hd${major}" ]; then
echo "WARNING bootdevice may be renamed. Try root=/dev/hd${suffix}"
fi
;;
esac
echo "Gave up waiting for root device. Common problems:"
echo " - Boot args (cat /proc/cmdline)"
echo " - Check rootdelay= (did the system wait long enough?)"
echo " - Check root= (did the system wait for the right device?)"
echo " - Missing modules (cat /proc/modules; ls /dev)"
panic "ALERT! ${ROOT} does not exist. Dropping to a shell!"
done

# Get the root filesystem type if not set
if [ -z "${ROOTFSTYPE}" ]; then
FSTYPE=$(get_fstype "${ROOT}")
else
FSTYPE=${ROOTFSTYPE}
fi

[ "$quiet" != "y" ] && log_begin_msg "Running /scripts/local-premount"
run_scripts /scripts/local-premount
[ "$quiet" != "y" ] && log_end_msg

if [ "${readonly}" = "y" ]; then
roflag=-r
else
roflag=-w
fi

# FIXME This has no error checking

modprobe ${FSTYPE}
##########################################################################
###### Mod'd by Brian Phelps aka Electronjunkie ##########################

mkdir /root/.tmpfs
mkdir /root/.rootfs

mount -r -t ext2 /dev/sda1 /root/.rootfs

modprobe aufs
modprobe loop
mount -t tmpfs -o size=20M tmpfs /root/.tmpfs

mount -t aufs -o br:/root/.tmpfs=rw:/root/.rootfs=ro none /root/
mv /root/etc/fstab /root/etc/fstab.defunct

#########################################################################

# FIXME This has no error checking
# Mount root

[ "$quiet" != "y" ] && log_begin_msg "Running /scripts/local-bottom"
run_scripts /scripts/local-bottom
[ "$quiet" != "y" ] && log_end_msg
}

BRP-PACU Version 2.0.0 Released Today

December 31, 2008

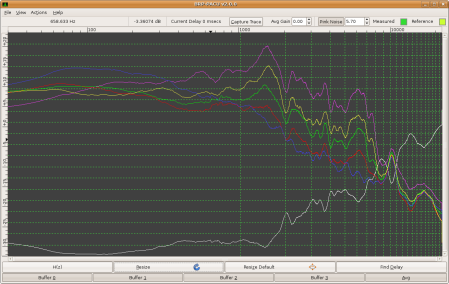
Its been a while since I posted anything about BRP-PACU, a dual channel FFT based Acoustic Analysis Tool to help engineers configure professional sound systems.  I have been using it regularly, but I recently became motivated to improve it.  Here is a list of improvements obtained from the Changelog.

Screenshot ov BRP-PACU version 2

Screenshot of BRP-PACU version 2

Basically now you don’t need an external pink noise generator or a dual channel capture card.  Just one input should work fine.

Version 2.0.0 Pink Noise and Jack Support (allowing possible Mac OS-X support?)

  • Update on Mac OS-X, my wife’s laptop hasn’t got enough disk space to install macports, xcode, etc, anyone out there who would like to check it out though let me know.
  • Also I need help packaging this for the OS-X and for Linux (deb).

I have a minimal Debian & Xfce based vmware image, which will run on any x86 Mac/Linux/Windows, though.  Not sure how to distribute +850MB of data yet, as ISP’s tend to limit upload bandwidth to a trickle.

Added Pink Noise Output and  the ability to Un/Mute and adjust levels

Added Jack Audio Connection Kit support and removed Alsa (removing need for linux)

  • Automatically connects Reference and Measured inputs to Channel 2 and Channel 1
  • Automatically connects Pink Noise Output to Reference Input and sondcard output
  • This app may now run on a Mac since alsa has been abandoned.  This may require some tweaking.

Major GUI and UI update!

*Delay function now resets delay before each capture, resulting in a much
more intuitive delay finding procedure.

*Rewrote buffer capture interface so that it makes more sense and works
consistently.

*Rewrote keyboard shortcuts so they don’t interfere with the Avg gain.

*Added default zoom button to return to original zoom settings.

*Added inserted delay size status on the status bar.

*Added “about” and “general help” windows

*TODO: ability to save buffers to a file.  Also a VM for windows and Ubuntu packages.
Miscellaneous Bug Fixes and updates.

High Speed Logic Analyzer FPGA

August 6, 2008
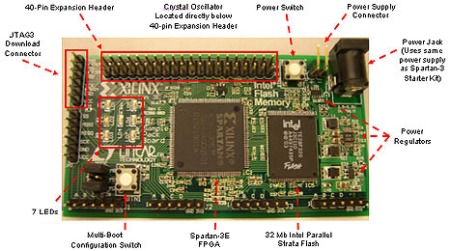
Spartan 3e Sample Board

Spartan 3e Sample Board

Many others have had the idea to build a logic analyzer based on an FPGA. I have some novel ideas that make it much easier and much more practical to accomplish this, while keeping the features of a much more expensive LA. Some qualities that make this idea unique:

  • Save Development time on the PC end Dramatically
  • Use a slow speed PC Bus
  • Sample at whatever speed the FPGA can dish out (100MHz easily for the spartan series)

The design strategies which make this possible are:

  • Use the 216Kbits of internal Block RAM (27,000 bytes)
  • Only record changes, and time value on the inputs, (dramatically saving RAM space), also making it easy to create vcd files from this data
  • Use the PC serial port (UART + Level shifter) or ft232r
  • Create a vcd file from the vcd-like dump
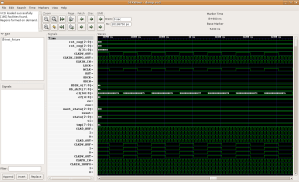
  • Use gtkwave on a PC to view waveforms in the vcd file
GtkWave in action, viewing a simulation

GtkWave in action, viewing a simulation

Limitations and Tradeoffs

Unforunately, as with any engineering task, there are numerous trade-offs. This design maximizes usefulness for my standard logic analyzing needs like sniffing data on an i2s bus, or capturing a usart bit-stream.

  • The Spartan3e is only 3.3V tolerant without voltage translators.
  • We can only capture about 10,000 bit “events” or so (usually enough though).
  • Triggering will be kept simple to keep the overall design simple (wait for a low signal or high signal).
  • Uses independent clock, so it is asynchronous to any local clock on the device we are sampling.
  • Need a PC

The constant clock limits complexity on usart / rs232 interface. Otherwise a clock must be calculated at run-time, and this is not practical. I also do not want to be limited to sampling systems with clocks. I always try to practice Keep it Simple Dammit (KISD).

Design Parts

The Hardware

I intend to start this project out on an older Spartan 3e development board. I will first create a block diagram and some logic timing diagrams. The inputs will be double buffered by flip-flops to avoid metastability caused by setup/hold violations on the asynchronous inputs. We can’t get rid of all of this, but we can minimize it. This is a common “hack” for asynchronous inputs. Just google it and you’ll see.

This project will be published on http://www.opencircuits.com.

The UI Software

I will create a simple GUI to control the Logic Analyzer (reset, set trigger, dump data). This will be based on GTK in Linux using C and uses just the serial port, so this should be easily ported to MS windows. I know you can embed GtkWave into an app, we’ll see if I get that ambitious though. You will be able to name the signals here. Grouping of signals may be added at a later date. Grouping is a feature I would rarely use.

VCD File Generator

A VCD file is an ASCII based file in which only changes are recorded. The format is simple enough that we don’t need a special library to read/write to VCD. It consists of a small header with things like the date, simulation time, and signal names. My UI program will generate a dump and call this VCD generator program to convert it to a VCD. It should be pretty simple.

Contributing

This design is intended to be open (source files and schematics are public) and anyone who is interested may contact me if they would like to help make it better or add features.

Unsolicited Free Audio Advice

June 11, 2008

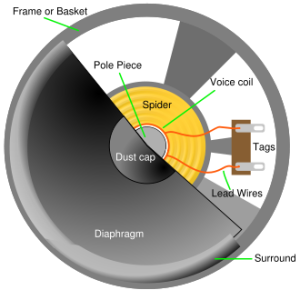
Attributions For Above Picture

Looking for advice on your next system? No? Too bad. Here it is.

Modern codecs (A/D & D/A converters) are 24 bit 192 kHz and a dime a dozen. You can’t get much better than that as far as noise and dynamic range are concerned. So the most effective place you can spend your money is in an easy to use receiver, the Speakers, and amplifiers. I say easy to use because many receivers are designed by UI buffoons. They are the intersection point of a system and ease of use and setup are at the top of my list.

Tube amplifiers have distortion that is more natural to the human ear. Class A amps are low-power and inefficient, but have the lowest distortion (most linear) if designed correctly. Don’t waste money on over-priced amps marketed with pseudoscience. The little distortion present in most modern amplifers isn’t really enough to fret over. If you think you can hear the difference, there are lots of folks like this guy offering $10K if you can in a blind test. Avoid the snake-oil vendors.

Now for some honest money saving advice and maybe a little toe stepping.

Bose is an interesting manufacturer. They have a well documented history of spending most of their money on marketing and almost none on research. Perfectly legal but I’d rather spend money on quality than marketing. Case in point: the Bose wave radio which is based on research from the 1920’s. It has one narrow resonance band at low frequencies that gives it its “full” sound. I have very little respect for Bose. They have some good stuff here and there, but it all carries the heavy Bose marketing tax.

Don’t waste your money on $700 power cords or expensive power conditioners/surge suppressors. They are pseudoscience BS but perfectly legal, like most of the herb and supplement market, and magnetic bracelets, etc. Nothing is gonna make it through the transformers, buck/boost converters, regulators, and capacitors that you are going to hear. Buy a $20 surge suppressor.

Also on $200 cables. If your system sounds better with one of these cables its probably because it is masking a ground loop that shouldn’t be there in the first place. Eliminate the ground loop first. You shouldn’t have to spend more money on 0-20kHz than the RF engineers spend on 1-2 GHz cable and connectors. This is a blatant ripoff also. Moving any signal in the audio range just doesn’t take that much effort to avoid noise and signal loss. Its actually laughable they get away with it. I could hook up your receiver with a coathanger and you couldn’t hear the difference. Speaker cables are the exact same. Oxygen free is BSt also. Buy something durable that is easy to tidy up.

As far as speakers in the home goes, there are great “practical” speakers that mount in the wall and use the space behind it as an enclosure. These usually sound great and because they use of the wall as a large “invisible” baffle. Speakers are the place you should spend your money. Sound for a home theater is considered “near field” and its actually 10 times easier to accomplish great sound here than filling a large space like a gymnasium or auditorium, where you need high-power drivers with specially designed horns for directivity. There is no need to spend thousands on a set of home speakers. I typically look at the specs (like Xover points, flat frequency response, and decent crossover design) and take a listen to make my decision. JBL’s are well designed, but you pay for that and then some.

I have heard some great chinese knockoffs from distributers like MCM. Here they are so cheap you can buy before you try. If you don’t like them, put them in the garage system. Get a good powered sub and you are set.

The things that can make or break a sound system are ground loops (buzz) caused by incorrect grounding, poor gain structure (distortion and hiss are present), crappy speakers, and an EQ that is incorrect. A good parametric EQ set using a dual channel spectrum analyzer is ideal, but not totally necessary if you choose the right speakers. You can’t set an EQ by listening to it. You can turn up/down the sizzle or the bass to your liking after the system is “flattened” however. Many people put in a “theater curve” by putting in a -3dB/octave dropoff after 2kHz after “flattening”.

I’ve stepped on a few toes, maybe even made an error or two. If you’re angry or dissatisfied with this post I am offering you a full refund. Otherwise feel free to respond with corrections.

Lawrence Lessig For Congress?

February 24, 2008

Mr. Lessig Goes to washington
This blog will usually avoid politics, but I just had to say something.

Forgive my cynicism, but isn’t this just another lawyer running for public office vowing to change DC? This is nothing new. If I had nickel for every politician that ran under that mantra in the last 100 years, I’d have a lot of er, uhm change? Crap, I screwed up that cliche. Well anyway…

The only way to change DC is unfortunately with (pick two) large sums of money, large groups of people, or large bullets and bombs, neither of which Lessig has to my knowledge.

I think his time would be better spent doing what he’s been doing all along, which is motivating as many people to respond to their elected officials as he can. He has done a hell of a job at this and should continue to grow it. This can make a gradual difference, especially if he can formulate a message that will influence more of the “Average American”.

He should model his movement after other successful lobbying groups such as the NRA.

If he introduces a successful bill that changes our laws on lobbying groups then I would gladly eat my words, but please Mr. Lessig, we need you out here fighting theses silly copyright laws.

Lets start an ad campaign, or better yet, a Reality Show. That will get the average Sam thinking seriously about the RIAA:

100 college students share files at a local university. The catch? The one with the most copyrighted songs after a month gets what the RIAA claims in damages in the subpoena letter. That ones yours Mark Burnett.

 Update! It looks like Lessig listened and dropped out!  I’m glad I could help with his reality check.  Brilliance is a gift, but common sense can come only from experience.

Embedded x86 Linux

October 11, 2007

Another Update: Check out the new version without squashfs here.
Updated!  I modified the squashfs and init so now the entire init script is executed properly, before it would work, but we were missing a few things in the final init stage.

DebianThis rough draft howto describes my experience, minus most of the goof-ups, of how you can setup a small x86 embedded system. A typical linux box that boots grub does the following:

  • Read the MBR
  • load the kernel pointed to by the bootloader
  • load the initial ram disk
  • execute an init script who’s main purpose is to set the environment up so that the real root file system can be mounted
  • then it mounts the FS and executes the real init script, but only after the preliminary init mounts the real root file system read/write.

Confused yet? It gets worse if you must use a read only file system like an IDE/CF flash disk. The preliminary init (ran from initial ram disk) must mount the real file system (usually squashfs) read only. It also sets up a read/write FS in RAM so that the system may store and use things later like /proc, /dev, and /var. After creating both read only and read/write file systems (FS) it merges them with the unionfs/aufs kernel function in init. Then it switches root and executes the real init. There fortunately are many “LiveCD” scripts that set this up for you automatically. These init scripts (like casper in Debian) are overkill and can break an embedded system whose environment is known ahead of time. Its a bit like using this toilet paper dispenser in a mission critical application, like after eating the Habenero Hotwings and drinking 5 pints of beer from the local pub.

Also I hate all the autodetecting that comes with most live cds, power glitches and other things can trick it and it is slooowwww, Embedded systems must be reliable! Mine are 500MHz dinosaurs with no electro-mechanical parts whatsoever.

I like to boot the target filesystem root on the target hardware as an actual r/w FS first and set everything up the way I want it. This has the side effect of also testing my hardware configuration and allows me to make major changes quickly.

Then I halt and mount the target on another host to freeze the system into my own read-only install. Remember! It must be readonly if we are to run off of flash in the end, b/c of the limited writes.

Here we go………….

First create skeleton debian install:
Usage: debootstrap [OPTION]… <suite> <target> [<mirror> [<script>]]

% debootstrap sid fs-root-debian-sid

Put this file system on a drive and boot your real hardware. Set everything up the best you can (Minor changes can bee made later, don’t worry).

Back at the host:

chroot to new install or boot the real system hardware using a non flash hard drive:

install squashfs-tools, kernel, and same versions of squashfs and unionfs kernel modules
You may have to fix /etc/resolv.conf for this and other apt based installations
# apt-get install kernel-image-xxx unionfs-modules-xxx squashfs-modules-xxx squashfs-tools

unchroot, do:

Create the boot-dir:

# mkdir -p fs-boot/boot/grub

chroot, do:
# apt-get install grub

make sure mkinitramfs and busybox is installed

unchroot, do:

Copy the boot loader

# cp -a fs-root/usr/lib/grub/i386-pc/* fs-boot/boot/grub/

Copy the kernel over:

$ cp -a fs-root/boot/* fs-boot/boot/

Create the squashed FS

% mksquashfs fs-root fs-squashfs.squashfs -all-root # Makes all files owned by root

On the chrooted target, install initramfs-tools
# apt-get install initramfs-tools

Now the tricky part, edit init scripts, then create the initramfs:

chroot to the fs-root and create our squashfs script:
# vim /usr/share/initramfs-tools/scripts/squashfs

modify it to look like the included file “squashfs_script”, some highlights are:

# This is how we mount the rootfs
# substitute /dev/sda1 for what it will be on the target upon boot, I’m using a usb flashdrive
mount -r -t ext2 /dev/sda1 /.tmpfs/.mnt
losetup /dev/loop0 /.tmpfs/.mnt/boot/fs-squashfs.squashfs
mount -r -t squashfs /dev/loop0 /.tmpfs/.sqfs

# Here we create the final rootfs
mount -w -t unionfs -o dirs=/.tmpfs/.overlay=rw:/.tmpfs/.cdrom=ro:/.tmpfs/.sqfs=ro unionfs /.union

# And switch over to the new FS and run the real init, This is done as the last line of the default debian etch init script, not the squashfs script, you should comment out the old last line:

# Chain to real filesystem
maybe_break init
#exec run-init ${rootmnt} ${init} “$@” <${rootmnt}/dev/console >${rootmnt}/dev/console
exec run-init /.union /sbin/init “$@” </.union/dev/console >/.union/dev/console

Now, still crooted as the target, edit /boot/grub/menu.lst to be:

# menu.lst – See: grub(8), info grub, update-grub(8)
default 0
timeout 5

title Debian live
root (hd0,0)
kernel /boot/vmlinuz vga=791 root=/dev/loop0 ramdisk_size=100000 boot=squashfs #username=user hostname=debian persistent
initrd /boot/file1.img
boot
# Note the boot=squashfs tells init to execute scripts/squashfs
# root=/dev/loop0 is our readonly root squashfs mounted in the initscript
# ramdisk_size=100000 gives the kernel (and us) some space (100M) to work with our unionfs

We’re almost done, now make the initramfs, recall we are still chrooted

# mkinitramfs -o file1.img <kernel-version-here>
please put your kenel version int the appropriate spot above (whatever string is appended to /lib/modules on the target)

Exit from chroot and copy the resulting file1.img to your targets’ boot directory /fs-boot/boot/

# cp file1.img /fs-boot/boot/

Now copy fs-root and fs-boot files to your production device, I’m using a usb flash drive (I assume is partitioned this way):

# cp -a fs-boot/* /mnt/sda1/
# cp -a fs-root/fs-squashfs.squashfs /mnt/sda1/

Make sure that the /proc /dev and /sys directories are empty, they will be filled later by the last stages of init on the unionfs

Install grub to the target device so it will boot, I will not cover that here, its covered everywhere else on the net quite well

I usually like to test the setup under vmware or qemu, as it can save time when debugging.

Comments? Mistakes? Help me make this better. I welcome all non-spam feedback.

BRP-PACU Most Major Update Ever, File Release At Last!

October 9, 2007

File Release!!

For those of you new here, BRP-PACU is an open-source program capable of real-time audio analysis of professionally installed loudspeaker systems. The idea is to use a calibrated microphone to measure the response of a room to playing a reference signal which is usually pink-noise but could be Pink Floyd, as long as it has decent spectral characteristics. The measured signal gets fft’d and divided by the reference signal’s fft. This is captured at 3-5 locations. These captures are then averaged and flipped, then used to calibrate the system.

If none of this rings a bell you probably should read some of my other post topics, because this stuff is probably gonna bore you.

It uses GTK+, alsa-lib, gtkdatabox, fftw, and more! Many of the algorithms were first tested and simulated with Gnu-Octave. Sorry windows users, this requires alsa so tough luck, but you could try it under VMWare, VirtualBox, or Qemu, or even an Ubuntu dual boot.

From my Project News page at sourceforge.net:

Posted By: electronjunkie
Date: 2007-10-09 12:30
Summary: Current Project Status I have made significant progress now with this project. While it is still not usable in its current state, it does the following:

  • Displays FFT of Blackman Windowed audio input in real-time.
  • Displays the transfer function, H(f) = Y(f) / X(f), of the measured system (channel one divided by channel two, or output (measured) divided by input (reference)), where X(f), Y(f) is the fourier transform of the output and input respectively.
  • GUI now uses the quick excellently documented gtkdatabox library instead of the scantily documented libgoffice. Great Success!
  • Averaging function for the H(f) frame, so graph doesn’t bounce/jump in time and smoothing of the plot to make the data more readable by humans, ex: H(f) = (H(f-1) + H(f) + H(f+1))/3.
  • Impulse Response now works! h(t) = H-1(F)

*Output is in dB and Octaves like humans hear, as opposed to Voltage and frequency in Hz, with actual frequency in Hz displayed under mouse cursor.

Todo:

  • Add channel 1 & 2 signal indicators
  • Add support for more than the 4 + averaging buffer.
  • Add save as support (so that a session can be saved). This is something even the expensize programs like SMAART do not do. How many times have you sampled a room just to have SMAART or your PC lock up and lose your buffers. It will also allow you to save samples for future reference.

These items are actually trivial to implement. As an engineer all the fft/data related processing is easy to me, the hard part has been the programming read tape (fixing Makefiles to include libraries, using the libraries API’s). But I have learned some excellent concepts along the way.

Currently we are using one thread for the gui/fft app and one thread to obtain the audio. I’ll probably separate the gui from the fft thread, so that I may change the audio thread to a callback instead of polling. Right now I just want to make it work, then I will optimize the coding later.

The code will be released at version 1.0, as it will not be released until I have tested for memory leaks, and actually used it to calibrate a sound system. RT60, and other measurement features will be available in later version releases.

BRP-PACU

August 31, 2007

Update! fixed link that sourceforge somehow broke.

BRP-PACU

Brian’s Reasonably Priced Professional Audio Configuration Utility

Audio Engineering With Linux Part II

BRP-PACU in action capturing noise.

File Release today! The code is GPL. To all you MS windows folks out there this means the program is free as in it costs $0. It is also free to use, distribute or even sell, but the source code must be included (upon request) and it must retain the GPL license. Contact your lawyer for more details on legal redistribution.

Un/fortunately it will not run under MS Windows, unless someone decides to modify my code to do so. I may decide to distribute a Linux VMWare player image so that MS Windows folks can use it. There won’t be a huge quantity demand for this software, but those that have a use for it will be desparate enough to use a virtual machine. If someone would like to donate money I will port it to MS Windows. Make me an offer.

Here is a brief description of the project:

Currently there is only overpriced Live Acoustical Analysis ($600-$1200) software capable of performing the transfer function of FFT’s for sound system configuration. This is ridiculous considering the trivial nature of the concepts, but understandable since there is only a limited audience. There does not seem to be an Open Source Version available. And there definitely is no software available under Linux.

This project is written for engineers who configure professional audio systems. It’s main feature will be the ability to take multiple sample transfer function plots (output FFT / input FFT), average them together, and flip the averaged plot to aid in final equalization. Nearly all Professional Audio Engineers use this function now rather than the older Real Time Analysis method because it is quicker and just as precise. This technique is powerful and quick, but very difficult to master, perform properly, and requires a special microphone and mixer to do correctly.

This project will also be able to provide a simple FFT plot to aid in finding room modes and quick audio verification.

This Project uses the FFTW package, libgtkdatabox, GTK+, alsa, and is programmed in C, and runs under Linux.

I currently have a dual threaded program, one which collects audio data, and one that performs the FFT and plots the results. It currently is a full featured audio analysis tool capable of finding the delay automatically in a system and is able to find both the transfer function and the impulse response of an audio system.